
Hello!
I’ve got the robot running off of timestamps! I’ll separate this out into steps:
1. run the simulated neural network
Here’s the code and resulting output-display:
W = log(abs(randn(15)));
>> [spk NetParams V] = SimLIFNet(W,'simTime',50,'tstep',1e-2,...
'offsetCurrents',1.1*ones(length(W),1));
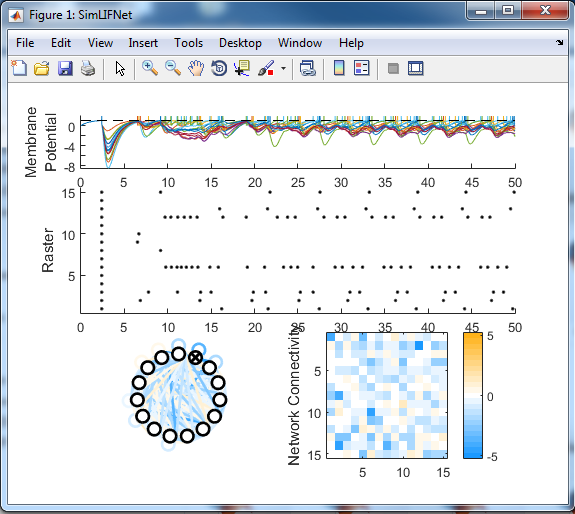
2. detect intersections
This is a simulation, which gives me the freedom to choose arbitrary ‘indicators’ from the output. Here’s a picture of the ‘spk’ array that stores what times each neurons spikes. It’ll help with the explanation:

So you can see how some neurons spike really often and some spike only once (which is when literally all of the neurons spike, so that’s not particularly useful). I liked the neurons represented in columns 3, 6, and 12, because they had a pretty decent amount of spiking. Here’s the next bit of code I wrote:
A = intersect(round(spk{6,1}), round(spk{12,1}));
B = intersect(round(spk{6,1}), round(spk{3,1}));
C = intersect(round(spk{15,1}), round(spk{1,1})); %where do the arrays in rows 1 and 15 intersect?
The interesting part is what comes next:
for t = 0:50
if(intersect(t,A))
disp('back!');
end
else if (intersect(t, B))
disp('right!');
end
else if (intersect(t, B))
disp('left');
end
end
So you’ll notice all the way at the beginning that I ran the simulation over 50 time steps. That’s why this for-loop has 50 intervals. Then for each time-step, I’m checking whether both of the designated neurons spiked (then). If they did, then I display the appropriate robot command.
3. take it to matlab & arduino
So then I modified the above MATLAB code slightly so it could interact with XBee. It looks like this:
s = serial('COM13', 'BaudRate', 9600, 'Terminator', 'CR', 'StopBit', 1, 'Parity', 'None');
fclose(s);
fopen(s);

for t = 0:50
if(intersect(t,A))
fprintf('k');
end
else if (intersect(t, B))
fprintf('l');
end
else if (intersect(t, B))
fprintf('j');
else
fprintf('i');
end
end
Then I went back to the post ‘XBee Test Sketch‘. I used the Arduino code that’s pasted in there.
Here’s a video of the result!
4. What next?
You may have noticed in the video that only one wheel is running. Well… I’m not super why that is :). I just received a replacement MEGA 2650 (not official Arduino, though, lol) so I’m going to try rewiring my entire project up to it and see if it solves the issue.
Hooray!